The main idea is to create an app and template for a web page, which provides a continuous feedback on RPI status and allows to control running processes and GPIO lines. The template shall be easy to modify to adapt it to any RPI application. As this application is fully web-enabled it can be operated from any browser - also including mobile devices, without necessary to program a single line code on a mobile client. No need to learn android or iOS :) coding.
- Complete application to control tvheadserver and oscam servers via a web page (also on mobile)
- Test program to show how to reuse the concept for an own interface
Note
In order to control tvheadend and oscam server, it is necessary to install the hardware (easymouse 2, power relay for an usb tuner) and software part described here. Test program requires simple hardware test board to control breadboard
Note
Assumption: you use the newest jessie raspian version.
If not yet done install necessary python libraries:
- psutil, library for retrieving information on running processes and system utilization
- gevent, a coroutine -based networking library providing a high-level synchronous API on top of the libev event loop
- flask, a micro web framework
sudo apt-get install build-essential python-dev python-pip
sudo pip install transitions
sudo pip instal psutil
sudo pip instal gevent
sudo pip install flask
Note
To run the test program and start and stop an example of a python daemon additional
itertoolslibrary is need.
Install itertoolslibrary:
sudo pip install itertoolsones done as the pi user run:
cd ~
clone https://github.com/petervflocke/flasksse_rpi web
chmod 755 web/myreboot.sh web/testdaemon.py
To start the web control app for tvheadend and oscam use command:
sudo python ~/web/sse.py
This can be started via ssh or directly on RPI
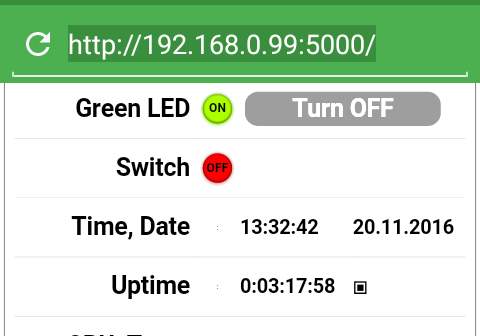
This application answers at the raspberry pi IP address on port 5000. The link follows: http://raspberryip:5000/ where raspberryip=local ip of the RPI. In my case:
In this repository you can find one module more, which can be easily reused in other projects.
You can reuse and tailor to your needs the main sse.py application, however in this repository there is another example simple.py, which creates a template, one can easily modify and extend to control RPI, processes and or GPIOs.
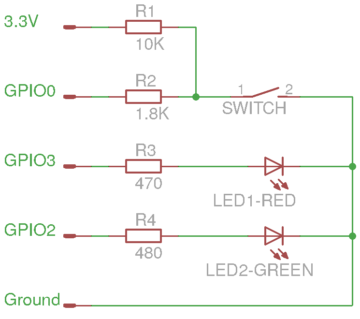
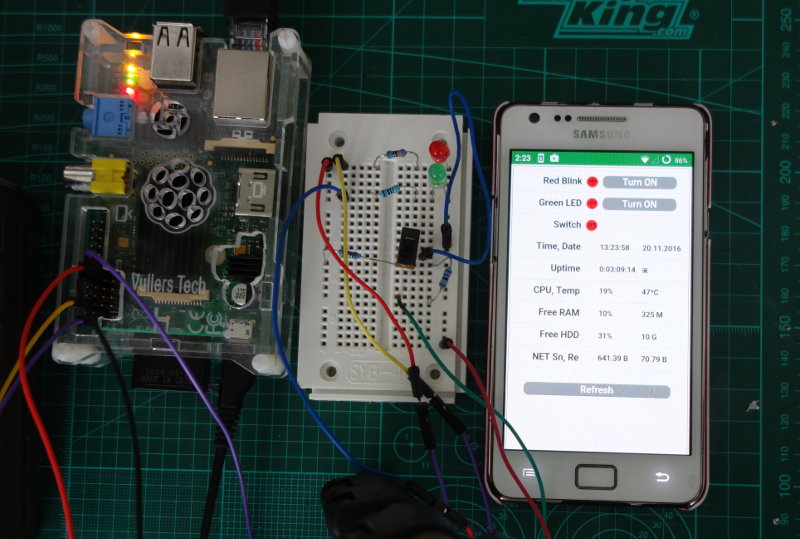
In order to run this test, a simple test circuit is needed. It can be done on a breadboard and shall follow below circuit schema:

The test app in action can be checked on youtube: 
The test web application simple.py, which controlls `testdaemon.py service, one GPIO line and reads one GPIO , can be run as a pi user by:
sudo python ~/web/sse.py
or to leave the application running in bacground:
sudo python ~/web/sse.py > /dev/null 2>&1&
This application answers at the raspberry pi IP address on port 5000. The link follows: http://raspberryip:5000/ where raspberryip=local ip of the RPI. In this example (and in the main sse.py app) there are two main files:
- simple.py, which is responsible for the application logic and network communication
- template/index.html, which is used to render the application page
Note
index.htmlfile must stay in a sub-foldertemplate- Index.html does not need to be modify, as long as the predefined status fields (such as: time, date, uptime, haert beat, CPU load, CPU temp, free RAM, free disk space, and network utilisation) can stay on the page.
- Index.html does not need to be modify if you are going new GPIO lines or service switches
Dictionary Services stores the main configuration and status control data structure.
The Dictionary consists of service numbers to iterate through the service definitions. Service definition, another dictionary consist of following key: value pairs
Services = {
    10 : {'name' : 'Red Blink',                                         # Name to be displayed on web page
          'fun' : process,                                              # Name of the function, which controls this service behavior (status, change, start, stop, etc
          'pfun1' : 'testdaemon',                                       # in this case it is a service, here is defined name of the service to be check on the puitls list
          'pfun2' : None,                                               # not used, additional field, can be used as a second parameter or whatsoever
          'pfun3' : '/home/pi/web/testdaemon.py start',                 # external command to start the service (can be for example a script or service binary file
          'pfun4' : '/home/pi/web/testdaemon.py stop',                  # external command to stop the service
          'id' : 'serviceABC',                                          # name of the html id to be incorporated into the index.html template, must be unique within this Services
          'state' : 99,                                                 # current status of the service 99 means unknown
          'newstate' : 0,                                               # new desired status of the given service
          'switch' : 1,                                                 # 1 means display the button to change the service status, 0 just display the service status (no change from this app
          'lon' :  '<div class="led-green">ON</div>',                   # HTML to display green (ON) LED
          'loff' : '<div class="led-red">OFF</div>',                    # HTML to display red (OFF) LED
          'lpro' : '<div class="spinner"></div>',                       # HTML to display "processing" unknown status
          'bon' :  '<a href="/10/off" class="myButton">Turn OFF</a>',   # HTML to display "Turn Off" button, the number must point at service number and off/on has be a valid parameter
          'boff' : '<a href="/10/on" class="myButton">Turn ON</a>',     # HTML to display "Turn On" button, the number must point at service number and off/on has be a valid parameter
          'bpro' : '<div class="myButtonOff">Processing</div>'},        # HTML to display "processing" button (without any function)
    11 : {'name' : 'Green LED',                                         # Next service
          'fun' : set_gpio,                                             # different function to control service (in this case GPIO line) behavior
          'pfun1' : out01,                                              # GPIO object
          ...
          ...
          ...
    12 : {'name' : 'Switch',
          'fun' : check_gpio,                                           # Another example of a GPIO line in "read only / input " mode
          ...
          ...
          ...
          'bpro' : '<div class="myButtonOff">Processing</div>'}
}
See the source code for more implementation details, especially if the GPIO controlling part reflects your needs.
In order to add a new service a complete dictionary structure has to be added and defined accordingly. Almost all "None" have to be replaced
	ServiceID:
         {'name'     : None,
          'fun'      : None,
          'pfun1'    : None,
          'pfun2'    : None,
          'pfun3'    : None,
          'pfun4'    : None,
          'id'       : None,
          'state'    : None,
          'newstate' : None,
          'switch'   : None,
          'lon'      : None,
          'loff' 	 : None,
          'lpro' 	 : None,
          'bon' 	 : None,
          'boff' 	 : None,
          'bpro' 	 : None
         }
Removing the service is easy, delete the service "sub-dictionary" from Services
Second dictionary sse_parm creates data exchange structure used to update all dynamic information on the page, via separate thread sse_worker() responsible for server side event process. The content of the sse_parm is regularly updated by param_worker(): one thread for all sse_parm.
sse_parm = {
            'time'       : '',  # display time on RPI
            'date'       : '',	# display date on RPI
            'uptime'     : '',	# display uptime from last boot
            'heartbeat'  : '',	# display kind of haert beat symbol to show that the connection works
            'cpup'       : '',	# show RPI CPU utilisation
            'cput'       : '',	# show RPI CPU temperature
            'ramp'       : '',	# used RAM in %
            'ramf'       : '',	# free RAM i Bytes
            'hddp'       : '',	# used disk/SD card space in %
            'hddf'       : '',	# free disk space in Bytes
            'nets'       : '', 	# Net outgoing bandwidth
            'netr'       : '',	# Net incoming bandwidth
}- This structure consists of several elements from the fixed RPI status part.
- The dynamic GPIO/Service part defined in the
Servicedictionary has to be added now (or later during the update).
Note
Both application, the test one (simple.py) and sse.py (for tvhead and oscam)) uses the same index.html file to render the final application interface page.
Index html file does not use any graphical file. Check the css definition for different control symbols (LED, processing, etc). The file has a dynamic part rendered using Flask render_template method the inja templating system. The HTML body part has two parts:
- the dynamic part created via
Servicesdictionary and - the "fixed" part with RPI status info. If the status is not needed can be removed from the html file and
sse_paramdefinition accordingly.
The dynamic part has a table structure 3 columns x n rows, where number of rows reflect the number of services to be controlled
{% for s in services %}
<div class="divTableRow">
<div class="divTableCell1">{{ services[s].name }}</div>
<div class="divTableCell2">
<div id="LED_{{ services[s].id }}" class="led-box">
{% if services[s].state == 1 %}
<div class="led-green">ON</div>
{% elif services[s].state == 0 %}
<div class="led-red">OFF</div>
{% else %}
<div class="spinner"></div>
{% endif %}
</div>
</div>
{% if services[s].switch == 1 %}
<div id="BUT_{{ services[s].id }}" class="divTableCell3">
{% if services[s].state == 1 %}
<a id="bt{{s}}" href="/{{s}}/off" class="myButton">Turn OFF</a>
{% elif services[s].state == 0 %}
<a id="bt{{s}}" href="/{{s}}/on" class="myButton">Turn ON</a>
{% else %}
<div class="myButtonOff">Processing</div>
{% endif %}
</div>
{% else %}
<div id="BUT_None" class="divTableCell3"> </div>
{% endif %}
</div>
{% endfor %}All objects to be updated via Server Side Events process are getting unique IDs from the Servicedictionary.
The fixed RPI status screen part is rendered as a 4x6 table, also with respective IDs.
  <div class="divTable">
    <div class="divTableBody">
      <div class="divTableRow">
        <div class="divTableCell1">Time, Date</div>
        <div class="divTableCell2">:</div>
        <div class="divTableCell4"><div id="time"></div></div>
        <div class="divTableCell4"><div id="date"></div></div>
...
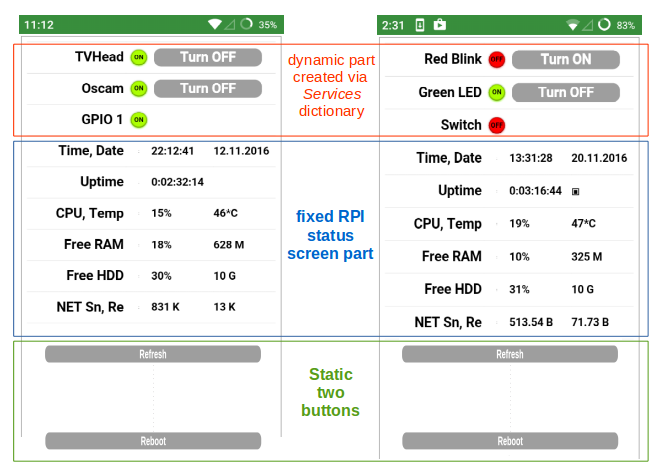
Refer to below picture showing screen layout and respective dynamic, fixed and static parts

Note
testdaemon.pyruns as a service and turns on and off GPIO3 (BCM22) in an endless loop.testdaemon.pymust have executable access permissions
The main web application see.py, which controlls the tvheadend and oscam services, can be run as a pi user by:
sudo python ~/web/sse.py
or to leave the application running in bacground:
sudo python ~/web/sse.py > /dev/null 2>&1&
In the file settings.pyfollowing parameters can be configured:
... to be continued
